Intro
This is part two of our Vault for Dummies series. After setting up a Vault server with Raft and TLS in part1, we’ll now configure it to auto-unseal at startup using another Vault server as a Transit engine. Perfect if you want to simulate a cluster across nodes in WSL. This guide walks you through everything step by step so your Vault can start with full access to secrets engines—with no manual unseal required.
🔐Vault Seal/Unseal – Quick Refresher
When Vault starts, it is in a sealed state, meaning it can access its storage backend but cannot decrypt any secrets yet.
- Vault data → encrypted with an encryption key in the storage backend
- Encryption key🔑→ decrypted using the master (root) key
- Root key🗝️→ unlocked with unseal key(s) ➤ You must unseal Vault to fully operate it.
🔓Unsealing: Is the process of providing the necessary keys to unlock the root key, needed by Vault to decrypt its internal encryption key (keyring). There are three options: Manual unseal, Cloud & Transit Auto-Unseal.
🤖 Why Transit Auto Unseal?
Sealing-state provides security, but manual unsealing adds overhead on your ops team. Imagine having to unseal 100 servers after each maintenance/reboot and wake all your key holders in the middle of the night🌛. Transit Auto Unseal cuts that pain by letting a trusted cluster handle root key decryption at startup—no human needed.
💡WSL1 Assumptions
- We will add a second custom static IP using PowerShell to allow for two Vault nodes in a single machine.
- WSL1 doesn’t support
systemd, so a boot-startup script must be invoked via thewsl.conf.
Lab Configuration
This setup covers the Vault Associate exam basics—check the Part1 tutorial for the full configuration.
| Configuration | Vault 1(WSL instance1) | Transit Vault 2 (WSL instance2) |
|---|---|---|
| storage node_id | node1 | node2 |
| cluster address (wsl) | https://192.168.57.1:8301 | https://192.168.56.1:8201 |
| api address (wsl) | https://192.168.57.1:8300 | https://192.168.56.1:8200 |
| listener address (wsl) | https://192.168.57.1:8300 | https://192.168.56.1:8200 |
| TLS Enabled | true | true |
| storage path | /opt/vault/data | /opt/vault/data |
| OS | Ubuntu 18 LTS | Ubuntu 22 LTS |

I. Getting Started
1️⃣ Install Vault (both instances)
📥 Download & Install Vault Binary (Linux)
wget -O vault.zip https://releases.hashicorp.com/vault/1.18.3/vault_1.18.3_linux_amd64.zip
unzip vault*.zip && rm -f vault*.zip
chmod +x vault
sudo mv vault /usr/bin/vault

### ✅ Check Installation
$ vault --version
  Vault v1.18.3
⚙️ Enable Autocomplete
vault -autocomplete-install
complete -C /usr/bin/vault vault
👤 Create Vault User
sudo groupadd --system vault
sudo useradd --system --home /srv/vault --shell /bin/false --gid vault vault
2️⃣ Set a new Static IP for Vault 1 (WSL instance)
To run multiple Vault instances in WSL, you’ll need to assign static IPs into a loopback interface using PowerShell.
To give WSL1 a dedicated local static IP without affecting your main network connection:
- Install Loopback Adapter:
- Open Device Manager (🪟Win+X -> Device Manager).
- Click computer name, then Action > Add legacy hardware.
- Next > “Install the hardware that I manually select…” > Next.
- Select Network adapters > Next.
- Manufacturer: Microsoft, Model: Microsoft KM-TEST Loopback Adapter > Next > Next > Finish.
Assign new Static IP (192.168.57.1) to the host machine:
- Find its name (e.g., “Ethernet 4”):
Get-NetAdapter | Where InterfaceDescription -eq "Microsoft KM-TEST Loopback Adapter"
Name          InterfaceDescription               ifIndex Status  MacAddress
----------    ---------------------------------  ------ -------- --------------
Ethernet 4    Microsoft KM-TEST Loopback Adapter    57     Up    2-10-8C-3F-1F-*
- Add IP as Admin: (Use your chosen IP/Name).
New-NetIPAddress -InterfaceAlias "Ethernet 4" -IPAddress "192.168.57.1" -PrefixLength 24

IPAddress         : 192.168.57.1   <----- Our unique IP for Vault1 instance
InterfaceIndex    : 57
InterfaceAlias    : Ethernet 4
AddressFamily     : IPv4
Type              : Unicast
PrefixLength      : 24
...- Test the IP connectivity from a WSL instance (vault1 can now bind to 192.168.57.1.)
$ ping 192.168.58.1 -c 1
PING 192.168.58.1 (192.168.58.1) 56(84) bytes of data.
64 bytes from 192.168.58.1: icmp_seq=1 ttl=128 time=0.281 ms
3️⃣ Configure Vault TLS (with Raft)
Same as in the Part1 tutorial. You need to set the IPs accordingly for each vault instances (For Testing Only).
📁 Create TLS Directory
sudo mkdir -p /opt/vault/tls🔒 Add Opnssl conf file
$ vi vault-openssl1.cnf
[req]
distinguished_name = req_distinguished_name
x509_extensions = v3_req
prompt = no

[req_distinguished_name]
C = US
ST = State
L = City
O = Organization
OU = Unit
CN = 192.168.57.1 # Primary IP (vault1)

[v3_req]
subjectAltName = @alt_names

[alt_names]
IP.1 = 127.0.0.1
IP.2 = 192.168.57.1
🗝️Create the Self-Signed certificate pair
openssl req -x509 -nodes -days 365 -newkey rsa:2048 \
  -keyout /opt/vault/tls/vault-key.pem \
  -out /opt/vault/tls/vault-cert.pem \
  -config vault-openssl1.cnf
🔒 Set Permissions
sudo chown -R vault:vault /opt/vault/
sudo chmod 640 /opt/vault/tls/vault-key.pem
sudo chmod 644 /opt/vault/tls/vault-cert.pemroot:root ownership is more secure, with Vault user only having read access.
📁 Create TLS Directory
sudo mkdir -p /opt/vault/tls🔒 Add Opnssl conf file
$ vi vault-openssl2.cnf
[req]
distinguished_name = req_distinguished_name
x509_extensions = v3_req
prompt = no

[req_distinguished_name]
C = US
ST = State
L = City
O = Organization
OU = Unit
CN = 192.168.56.1  # Primary IP (vault2)

[v3_req]
subjectAltName = @alt_names

[alt_names]
IP.1 = 127.0.0.1
IP.2 = 192.168.56.1
🗝️Create the Self-Signed certificate pair
openssl req -x509 -nodes -days 365 -newkey rsa:2048 \
  -keyout /opt/vault/tls/vault-key.pem \
  -out /opt/vault/tls/vault-cert.pem \
  -config vault-openssl2.cnf
🔒 Set Permissions
sudo chown -R vault:vault /opt/vault/
sudo chmod 640 /opt/vault/tls/vault-key.pem
sudo chmod 644 /opt/vault/tls/vault-cert.pemroot:root ownership is more secure, with Vault user only having read access.
Add Certificate to the Trusted Store (both servers)
sudo cp /opt/vault/tls/vault-cert.pem /usr/local/share/ca-certificates/vault-cert.crt
sudo update-ca-certificates
4️⃣ Configuration transit Vault1 (TLS + Raft)
If you’re on Systemd friendly WSL, please refer to Part1 tutorial for Vault service creation. I’ll use a wsl.conf trick here.
📁 Create transit vault server Configuration file
### 1. Create Config Directory
sudo mkdir -p /etc/vault.d

### 2. Create the hcl config file
vi /etc/vault.d/vault.hcl
# Full configuration options can be found
# Here https://developer.hashicorp.com/vault/docs/configuration

storage "raft" {
  path    = "/opt/vault/data"
  node_id = "node2"
}
# Cluster
cluster_addr  = "https://192.168.56.1:8201"
api_addr      = "https://192.168.56.1:8200"

# HTTPS listener
listener "tcp" {
  address     = "192.168.56.1:8200"
  cluster_address = "192.168.56.1:8201"
  tls_cert_file = "/opt/vault/tls/vault-cert.pem"
  tls_key_file  = "/opt/vault/tls/vault-key.pem"
}

#Other
ui            = true
disable_mlock = true
✅ Validate & Set Permissions
vault operator diagnose -config=/etc/vault.d/vault.hcl
sudo chown -R vault:vault /etc/vault.d
sudo chmod 640 /etc/vault.d/vault.hcl
🌍 Set Vault Environment Variable
export VAULT_ADDR='https://192.168.56.1:8200'
echo "export VAULT_ADDR='https://192.168.56.1:8200'" >> ~/.bashrc

# 🔍 Check Vault Status
vault status
### check via API
curl -k https://192.168.56.1:8200/v1/sys/seal-status
1. Initialize vault cluster
vault operator init -key-shares=3 -key-threshold=2 > key.txt
### output
Unseal Key 1: xxxxxxxxxxxxxxxx
Unseal Key 2: xxxxxxxxxxxxxxxx
Unseal Key 3: xxxxxxxxxxxxxxxx
Initial Root Token: hvs.xxxxxxxxxxxxxxxx2. Use 2 keys at least to unseal Vault2:
vault operator unseal
# Enter at least 2 of the 3 unseal keys
Unseal Key (will be hidden): **************************
Key             Value
---             -----
Seal Type       shamir
Initialized     true
Sealed          false
Total Shares    3
Threshold       2
Unseal Progress 0/2
Unseal Nonce    n/a
Version         1.15.0
Storage Type    file
Cluster Name    vault-cluster-1234
Cluster ID      01234567-89ab-cdef-0123-456789abcdef
HA Enabled false- Create and add permissions to the file
start_services.sh
$ vi ~/.config/vault/start_service.sh
#!/bin/bash

# Replace this with your WSL node's static IP (e.g. 192.168.56.1)
export VAULT_ADDR='https://192.168.56.1:8200'  ## ➡️ Vault2

# Start Vault as a background process
vault server -config=/etc/vault.d/vault.hcl >> /var/log/vault.log 2>&1 &

$ chmod +x ~/.config/vault/start_services.sh
2. Configure wsl.conf to Run the Script on Launch
$ vi /etc/wsl.conf
[boot]
command="sudo bash /home/<your_user>/.config/vault/start_service.sh"

[user]
default=<your_username>
[network]
hostname = <Your_WSLhostname>
5️⃣🛡️Transit encryption Setup in Vault 2
1. Enable the Transit Secrets Engine on Vault 2 (your trusted cluster):
vault secrets enable transit2. Create the encryption key for unsealing:
vault write -f transit/keys/autounseal3. Create and apply the auto-unseal-policy that allows encrypt/decrypt operations on the autounseal key
vault policy write auto-unseal-policy - <<EOF
path "transit/keys/autounseal" {
  capabilities = ["update", "create", "read"]
}
path "transit/encrypt/autounseal" {
  capabilities = ["update"]
}
path "transit/decrypt/autounseal" {
  capabilities = ["update"]
}
EOF
Generate a Plain, Renewable Token (No Wrapping):
vault token create -orphan -period=24h -policy=auto-unseal-policy
Key                  Value
---                  -----
token                hvs.CAESICTtxxx
token_accessor       vhr3t7vGlEtAFbJe8P7RHAF0
token_duration       24h
token_renewable      true
token_policies ["auto-unseal-policy" "default"] 6️⃣🔐 Use Transit to Auto-Unseal Vault 1
In the configuration file, use the token directly (i.e config-autounseal.hcl)
$ vi  /etc/vault.d/config-autounseal.hcl

storage "raft" {
  path    = "/opt/vault/data"
  node_id = "node1"
}

cluster_addr  = "https://192.168.57.1:8301"
api_addr      = "https://192.168.57.1:8300"
ui = true
disable_mlock = true
# HTTPS listener
listener "tcp" {
  address     = "192.168.57.1:8300"
  cluster_address = "0.0.0.0:8301"
  tls_cert_file = "/opt/vault/tls/vault-cert.pem"
  tls_key_file  = "/opt/vault/tls/vault-key.pem"
}

ui = true

#mlock = true
disable_mlock = true

seal "transit" {    # 👈🏻 seal "transit" stanza.
  address         = "https://192.168.56.1:8200"
  key_name        = "autounseal"
  mount_path      = "transit/"
  disable_renewal = "false"
token = "hvs.CAESICTtxxx" # ⬅️ Token from Transit Vault2 🔌Start and initialize Vault 2:
vault server -config=config-autounseal.hclOpen another terminal and initialize your second Vault server (Vault 2). Save the token for later use.
$ VAULT_ADDR=http://192.168.57.1:8300 vault operator init
Recovery Key 1: BOEVB5Q0/xxx
Recovery Key 2: gE9BhsJSBxxx
Recovery Key 3: WoUxp1F3xxxx
Recovery Key 4: Xj55tUDrxxxx
Recovery Key 5: Yn1kOKxxxxxx

Initial Root Token: hvs.k8Z4E47GExxxx

Success! Vault is initialized (unseal transit configuration from node ubuntu22) june 5 7:53AM

Recovery key initialized with 5 key shares and a key threshold of 3. Please
securely distribute the key shares printed above.
Check the Vault 2 server status. It is now successfully initialized and unsealed.
$ VAULT_ADDR=http://192.168.57.1:8300 vault status
Key                      Value
---                      -----
Recovery Seal Type       shamir
Initialized              true
Sealed                   false    <--- 👍🏻 Auto-Unsealed
Total Recovery Shares    5
Threshold                3
II. Vault1 Auto-Startup in WSL
Finally to auto-start Vault on WSL boot, use a startup script + wsl.conf:
# vi  ~/.config/vault/start_service.sh
#!/bin/bash
nohup vault server -config=/etc/vault.d/config-autounseal.hcl >> /var/log/vault.log 2>&1 &
wsl.conf
# vi /etc/wsl.conf
[boot]
systemd=true
command="sudo /home/<your_user>/.config/vault/start_service.sh"

[user]
default=<your_username>
[network]
hostname = <Your_WSLhostname>
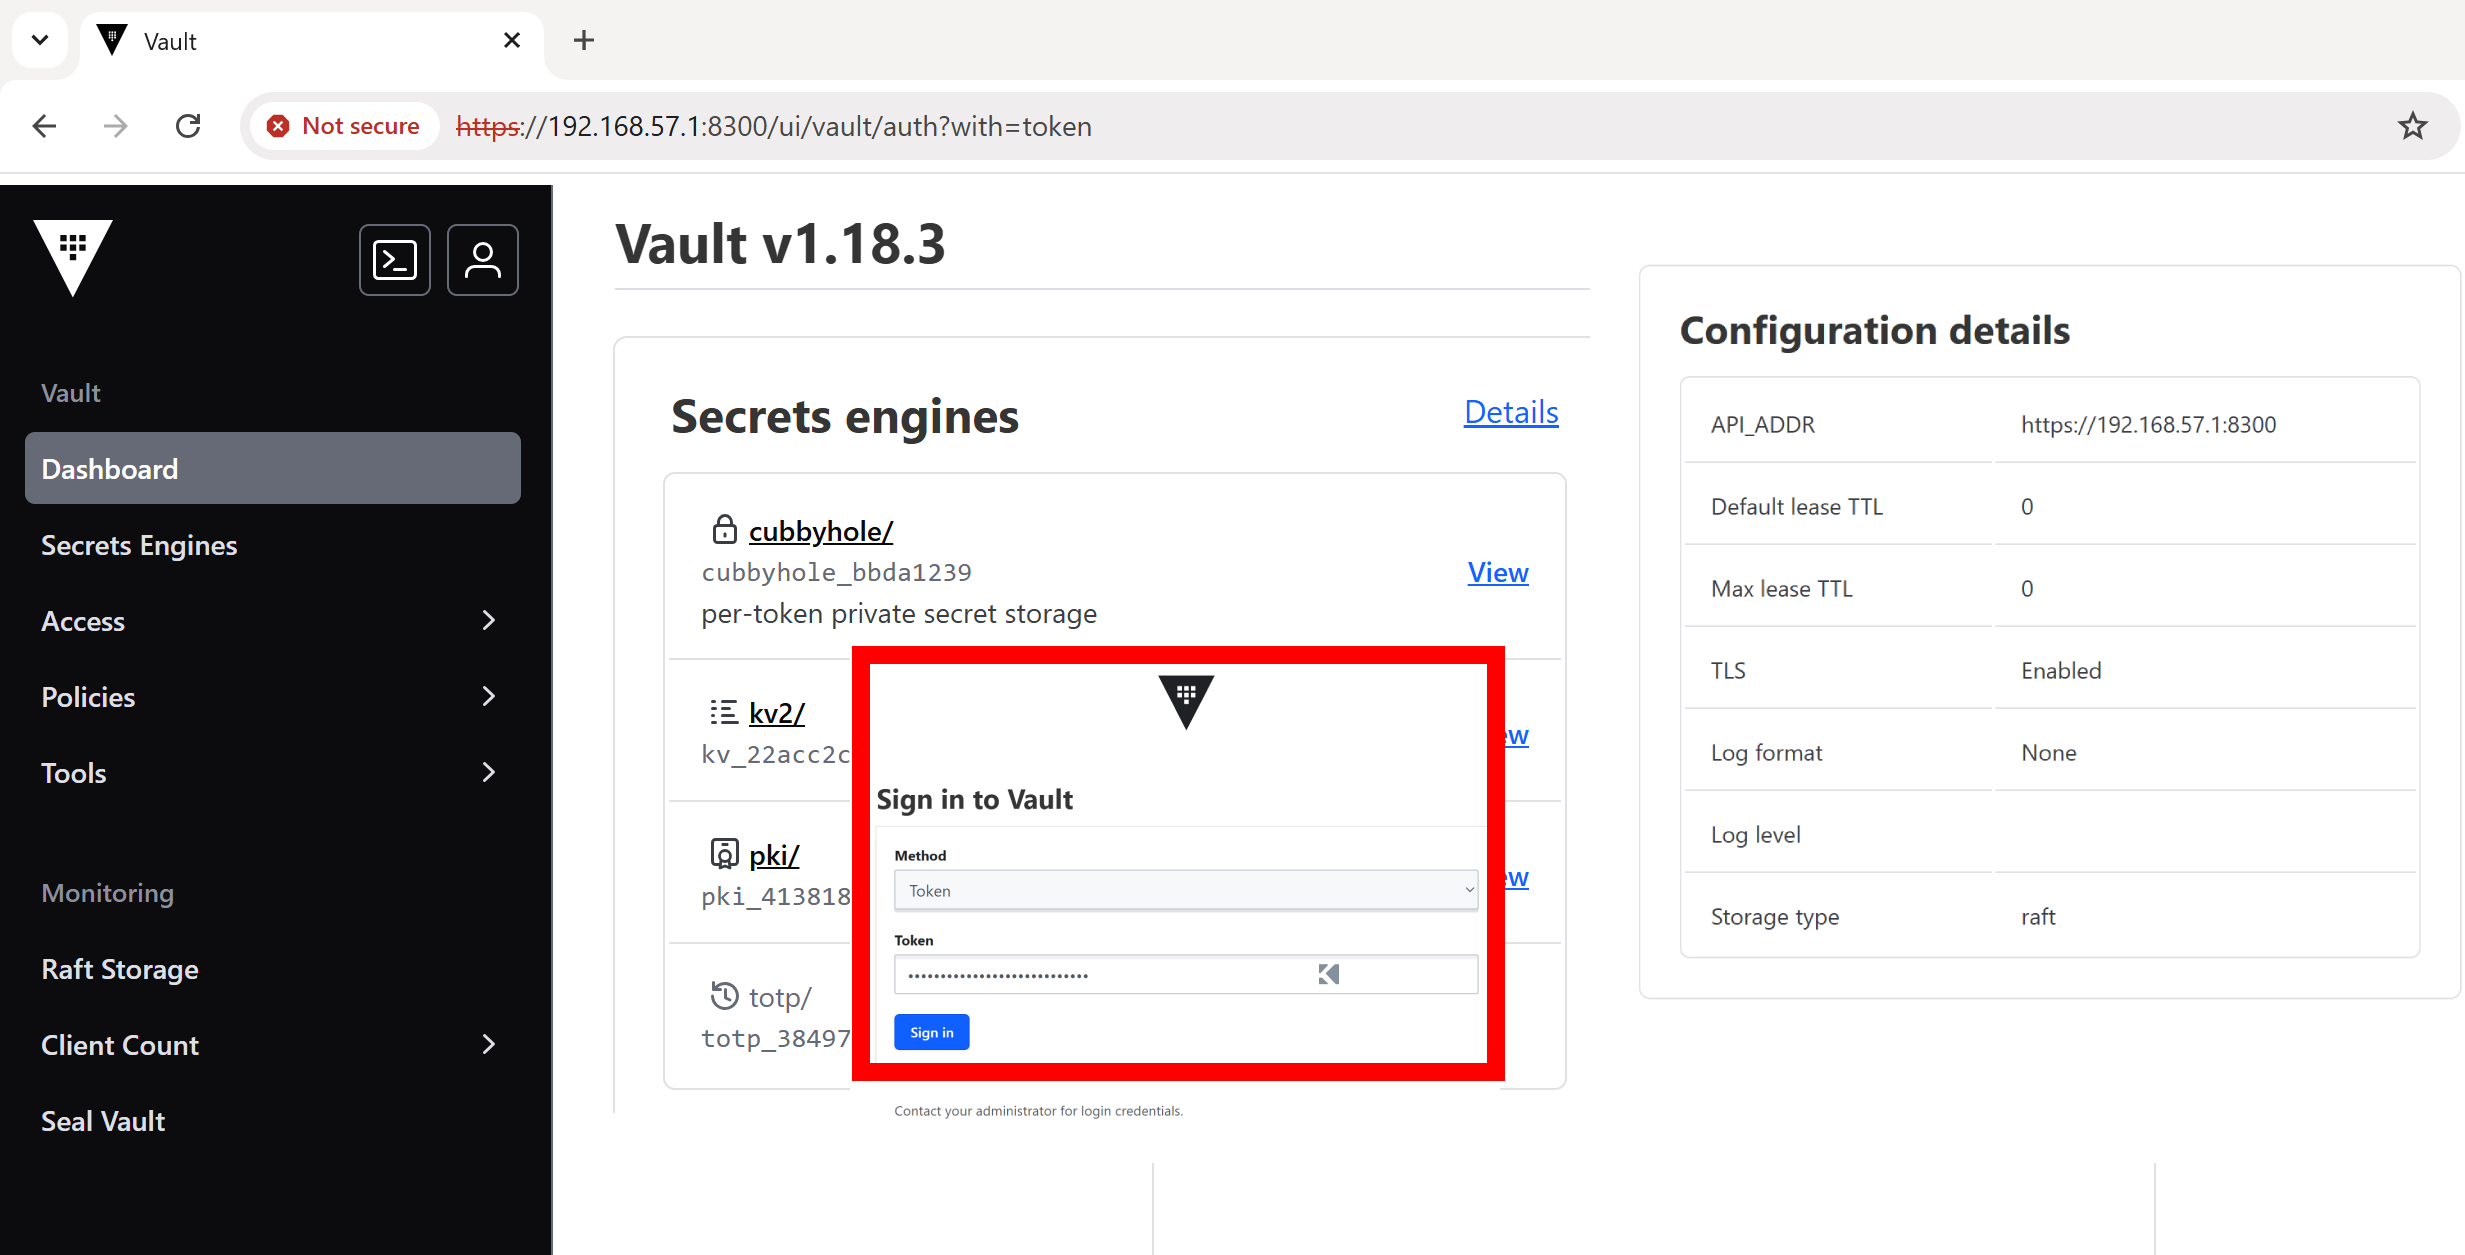
Login to the Vault UI
Once Vault is auto-unsealed, you can log in to the UI at its URL https://192.168.57.1:8300 using your saved root token.
🔽Conclusion
And that’s a wrap on setting up a 2-node Vault transit auto-unseal, static IPs, and a solid WSL dev environment! It took some digging (and a few stubborn IP conflicts), but now you’ve got a local setup that mirrors real-world scenarios. Perfect for deeper Vault practice or Vault exam prep.
Stay tuned for Part 3: K8s Auth setup in an External Vault 💥🔐

Run AI Your Way — In Your Cloud
Want full control over your AI backend? The CloudThrill VLLM Private Inference POC is still open — but not forever.
📢 Secure your spot (only a few left), 𝗔𝗽𝗽𝗹𝘆 𝗻𝗼𝘄!
Run AI assistants, RAG, or internal models on an AI backend 𝗽𝗿𝗶𝘃𝗮𝘁𝗲𝗹𝘆 𝗶𝗻 𝘆𝗼𝘂𝗿 𝗰𝗹𝗼𝘂𝗱 –
✅ No external APIs
✅ No vendor lock-in
✅ Total data control
𝗬𝗼𝘂𝗿 𝗶𝗻𝗳𝗿𝗮. 𝗬𝗼𝘂𝗿 𝗺𝗼𝗱𝗲𝗹𝘀. 𝗬𝗼𝘂𝗿 𝗿𝘂𝗹𝗲𝘀…
🙋🏻♀️If you like this content please subscribe to our blog newsletter ❤️.