Intro
I have been introduced to Oracle OVM rather accidentally. I was more familiar with the traditional vmware or hyper-V but when I was asked to help a client to implement their ovm backups, I got more curious about it. This post is the first of a series of 3.
I will try to show some basic examples on how to create resources like a vm using OVMCLI, since the web Console equivalent is overrated 🙂. OVM Manager CLI supports the same functions as those on the browser interface but can be scripted & fully automated to enable flexibility to help deploy and manage your OVM environment. CLI changes are reflected in real time in the OVM Manager Console.
Concepts
OVM Server is based upon Xen hypervisor technology, and includes Oracle VM Agent. Its Linux kernel is run as Dom0 to manage one or more DomU virtual machines, each of which could be Linux/ Solaris, or Microsoft Windows.
OVM Manager is a server side component that allows you to configure and manage your Oracle VM environment. It includes both a CLI and a web-based user interface. Users can create server pools and virtual machines, as well as manage networking and storage.
All right, let’s see how these commands work.
CLI examples
First let’s get acquainted with the CLI environment. How to connect to it and how its commands look like.
Create user
Admin user is created by default during the installation of ovm manager but additional users can be created.
[root@ovm-manager01 bin]# cd /u01/app/oracle/ovm-manager-3/bin/ [root@ovm-manager01 bin]# ./ovm_admin --createuserConnection to OVMMCLI
It can be done through ovm manger’s hostname or IP[ovm-mgr01]# ssh -l admin localhost -p 10000 # export ovmmhost=`hostname -s` [ovm-mgr01]# ssh -l admin $ovmmhost -p 10000 # export ovmip=10.10.30.60 [ovm-mgr01]# ssh -l admin $ovmip -p 10000Known connection issue:
Error “ OVMM CLI connection is not available on port 10000 host ovm-mgr01”
Workarounds
-
Check /start ovmcli service if stopped
[ovm-mgr01]# service ovmcli status|start
-
If Both “diffie-hellman-group1-sha1“ key exchange and “ssh-dss” host keys used by OVMMCLI ssh-server are disabled. Try them explicitly during the connection (openssh-client 7+) :
# ssh -oKexAlgorithms=+diffie-hellman-group1-sha1 -oHostKeyAlgorithms=+ssh-dss -l admin localhost -p 10000
-
Likely Solution:
Upgrade OVMM to 3.4.5 release or higher (i.e 3.4.6 ) if the version is older.
OVMMCLI commands
-
Like any CLI linked to an API CRUD like commands are available
create <objectType> [(attribute1)="value1"] ... [on <objectType> <instance>]
delete <objectType> <instance>
edit   <objectType> <instance>  (attribute1)="value1" ...
list   <objectType>
show   <objectType> <instance>
-- For Most Object Types with Children:
add    <objectType> <instance> to <objectType> <instance>
remove <objectType> <instance> from <objectType> <instance>

- Object types: ServerPool/vm/Vnic/Repository/Fileserver/network/Vdisk/physicaldisk …etc.
- Instance: { id=value | name=value }
-
Client Session Commands
set alphabetizeAttributes=[Yes|No]  ---> display output in alphabetical order.
set commandMode=[Asynchronous|Synchronous] --->  default CLI run mode is Synchronous.
set commandTimeout=[1-43200]               ---> in seconds.
set endLineChars=[CRLF,CR,LF]       ---> end of line character to use for your SSH client.
set outputMode=[Verbose,XML,Sparse] --->  output mode for command results.
showclisession                      ---> list CLI session options and their settings
-
Other Commands:
showallcustomcmds ---> list all commands and the objects that they relate to. showcustomcmds <objectType> ---> list all commands for an objectType (i.e vm) showobjtypes ---> list all object types. showversion ---> Shows the version of OVMM and its CLI. exitOur environment
1. Create a VM
-
Syntax
create Vm [ memory=value ] [ memoryLimit=value ] [ cpuCount=value ]
[ cpuCountLimit=value ] [ cpuPriority=value ] [ cpuUtilizationCap=value ]
[ highAvailability= { Yes | No } ] [ hugePagesEnabled= { Yes | No } ] [ osType=value ]
[ restartActionOnCrash= { RESTART | STOP | RESTART_AFTER_DUMP | STOP_AFTER_DUMP } ]
[ mouseType= { OS_DEFAULT | PS2_MOUSE | USB_MOUSE | USB_TABLET } ]
domainType= { XEN_HVM | XEN_HVM_PV_DRIVERS | XEN_PVM| LDOMS_PVM | UNKNOWN }
[ keymapName= { en-us |..| fr } ] [ bootOrder= { PXE | DISK | CDROM } ]
[ networkInstallPath=value ] repository=value [ server=value ]
[ startPolicy= { BEST_SERVER | BALANCE_SERVER | CURRENT_SERVER | USE_POOL_POLICY } ]
[ viridian= { Yes | No } ] name=value [ description=value ] on ServerPool instance
-
Example
OVM> create Vm name=My_server memory=8192 memoryLimit=8192 cpuCount=3 cpuCountLimit=4 osType="Microsoft Windows Server 2012" repository=OVM_repo1 domainType=XEN_HVM server=ovs-01 startPolicy=BEST_SERVER on ServerPool name=OVM-Lab ;
Time: 2021-03-28 02:47:35,332 EDT Data:id:0004fb0000060000549e161d2ea0400b name:My_server
-
Note: You can always edit the vm’s attributes after creation (i.e below domain Type has windows drivers)
OVM> edit Vm name=My_server domainType=XEN_HVM_PV_DRIVERS
2. Create a virtual disk to use as the boot disk
-
Syntax
 Create VirtualDisk size=value shareable= { Yes | No } sparse= { Yes | No } name=value
[ description=value ] on Repository instance
-
Example
OVM> create VirtualDisk name=My_disk size=60 sparse=Yes  shareable=No on Repository
     name=OVM_repo2  Time: 2021-03-28 02:48:17,120 EDT
 Data: id:0004fb0000120000edae47c4bf5252c8.img  name:My_disk
3. Map the virtual disk to the virtual machine
-
Syntax
OVM> create VmDiskMapping slot=value
     { physicalDisk=value | virtualDisk=value | virtualCd= { value | EMPTY_CDROM } }
      name=value [ description=value ] on Vm instance
-
Example
OVM> create VmDiskMapping slot=0 virtualDisk=My_disk name="My server Boot Disk"
     on Vm name=My_server

Time: 2021-03-28 02:49:10,135 EDT
Data:id:0004fb0000130000dce7093f1fb141c4  name:My_server Boot Disk
4. Map an ISO file to the virtual machine
-
Syntax
 create VmDiskMapping slot=value  { physicalDisk=value | virtualDisk=value | virtualCd= { value | EMPTY_CDROM } }
  name=value [ description=value ] on Vm instance
-
Example (here the Iso is located in the same repository than the vm config file
OVM_repo1)
OVM> create VmDiskMapping slot=1 virtualCd=WINDOWS_2012R2.iso name="DVDROM Drive" on Vm name=My_server
Time: 2021-03-28 02:49:42,553 EDT Data:id:0004fb00001300004693d433aafceca7 name:DVDROM Drive
with 100% completion but a warning that wasn’t impactful .
5. Set up the disk boot order
-
Example
OVM> edit Vm name=My_server bootOrder='CDROM,DISK' startPolicy=BEST_SERVER
Status: Success   Time: 2021-03-28 02:50:30,114 EDT
JobId: 1585378228467
6. Create a VNIC and add it to the virtual machine
-
Syntax
create Vnic network=value name=value [ macAddress=value ] [ description=value ] on Vm instance
-
Example
OVM> create Vnic name=Ethernet1 network=OVM-LAB-NET on Vm name=My_server
Status: Success  Time: 2021-03-28 02:51:46,227 EDT                                        JobId: 1585378294963                                                       Data: id:0004fb0000070000e6d766a1ce769034  name:Ethernet1
7- Start the vm
OVM> start vm name=My_server
  -- Restart a vm
OVM> restart { Server | Vm }   name =value
  -- Resume
OVM> resume  Vm   name=My_server
  -->  Miscellaneous <--
  -- Kill a server or a vm
OVM> kill { Server | Vm } name =value
  -- Migrate a vm
OVM> migrate Vm name=My_server destServer=MyServer OVM> migrate Vm name=My_server destServerPool=MyServerPool
List Commands
-
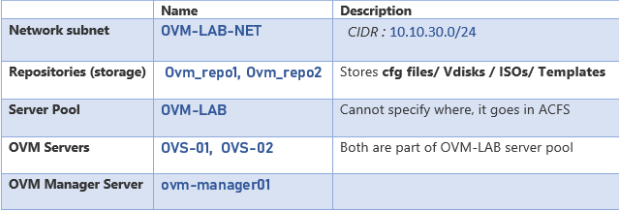
Repositories
OVM> list repository
      Command: list repository  Status: Success
      Time: 2020-03-19 19:47:16,227 EDT
 Data:
 id:0004fb0000030000d6744a0a7e3649db  name:OVM_repo1
 id:0004fb0000030000394dd4b78643b4b5  name:OVM_repo2
-
Servers
OVM> list server
     Command: list server     Status: Success
     Time: 2020-02-24 18:08:27,900 EST
Data:
    id:ff:20:00:08:ff:ff:ff:ff:ff:ff:00:21:28:e7:df:8e  name:ovs-01
    id:08:00:20:ff:ff:ff:ff:ff:ff:ff:a0:df:e7:28:21:00  name:ovs-02
-
Fileserver
OVM> list fileserver
     Command: list fileserver     Status: Success
     Time: 2020-02-24 18:10:27,634 EST
     Data:
       id:0004fb0000090000033d51d61b4a92fa  name:Oracle ZFS
Show Commands
-
VM
OVM> show Vm name=My_Server
Data:
 Status = Stopped
 Memory (MB) = 4096
 Max. Memory (MB) = 4096
 Processors = 2
 Max. Processors = 2
 VmDiskMapping 1 = 0004fb00001300002b1908da5ee6c251  [Mapping for disk Id
-
Virtual disk
OVM> show virtualdisk name=0004fb0000120000ed4b60a8dea41e5d.img Data: Absolute Path = /dev/mapper/3600144f08e../VirtualDisks/0004fb0000120000ed4b60a8dea41e5d.img Mounted Path = /OVS/Repositories/0004fb../VirtualDisks/0004fb0000120000ed4b60a8dea41e5d.img VmDiskMapping 1 = 0004fb000.. [Mapping for disk Id (0004fb0000120000ed4b60a8dea41e5d.img)] Max (GiB) = 300.0 Used (GiB) = 278.45 Shareable = No Repository Id = 0004fb00000300007292ef76d1746897 [VM Storage]Add a server to the server pool
-
In case the server is unassigned to a pool
OVM> add Server name=ovs-03 to ServerPool name=OVM-LaB


CONCLUSION
I didn’t want to put too much in one post but you get the gist of how the CLI interface works in OVM. The list of object types and the related commands is quite long. However, If you want to explore them in detail you can refer to the below document.

Next we will be talking about the logs available for OVM and some diagnostic tools required for SRs .
Thank you for reading