Intro
Have you ever finished a lab in your laptop with several virtual machines connected to each other and thought “Well that was neat! but how can I create a backup in my external hard drive and run it again at work or in any other computer?”
The answer lays in this very article. For those of you who have finished any RAC environment lab (i.e Racattack) in VirtualBox, saving images of the created Oracle RAC system and hand it over to another location for a restore could be done in a matter of minutes!
As matter of fact, Oracle VM VirtualBox can import and export virtual machines in Open Virtualization Format (OVF) which is an industry-standard format that we are going to use in this tutorial.
This tutorial will describe the steps to export then import a RAC environment in Virtualbox through import/export Appliance tools and other commands.
Considerations
The export of a VM is a straightforward process and saving RAC images would be an easy task if it weren’t for the shared asm disks.Therefore asm disks needed a bit more care than the guest systems but all was done in a timely manner. Furthermore, make sure your new computer’s VirtualBox Host Only Ethernet Adapter has the same IP segment than your Vms before importing them.
Note: The directory path names used during the export/import (C:/,D;/) should be adapted to your own environment.
Follow the below steps and try the GUI alternatives if you find it easier than the command line options.
1. Export Shared disks
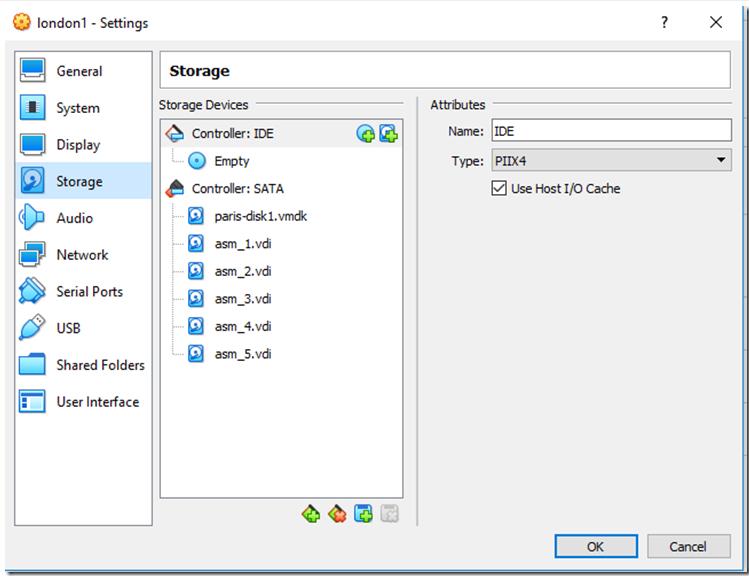
– Detach the disks from RAC VMs:
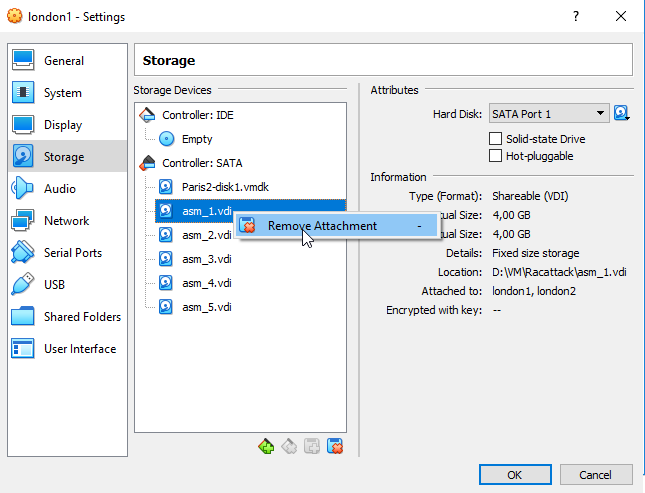
– Export them to a new location
"C:Program FilesOracleVirtualBoxVBoxManage.exe" clonemedium disk "C:VMRAC lablondon1asm_1.vdi" "H:OSORACLELab Oracleasm_1.vdi" --format VDI --variant Fixed
"C:Program FilesOracleVirtualBoxVBoxManage.exe" clonemedium disk "C:VMRAC lablondon1asm_2.vdi" "H:OSORACLELab Oracleasm_2.vdi" --format VDI --variant Fixed
"C:Program FilesOracleVirtualBoxVBoxManage.exe" clonemedium disk "C:VMRAC lablondon1asm_3.vdi" "H:OSORACLELab Oracleasm_3.vdi" --format VDI --variant Fixed
"C:Program FilesOracleVirtualBoxVBoxManage.exe" clonemedium disk "C:VMRAC lablondon1asm_4.vdi" "H:OSORACLELab Oracleasm_4.vdi" --format VDI --variant Fixed
"C:Program FilesOracleVirtualBoxVBoxManage.exe" clonemedium disk "C:VMRAC lablondon1asm_5.vdi" "H:OSORACLELab Oracleasm_5.vdi" --format VDI --variant Fixed
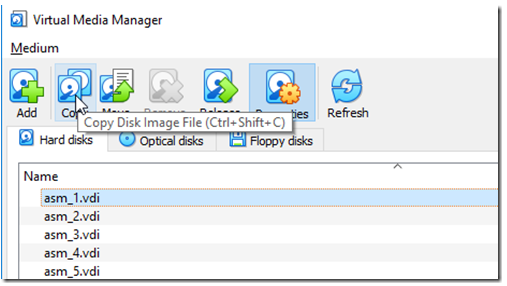
Note: You can also start Disk Copying Wizard which is a GUI equivalent to the above.
2. Export the VMs to ovf templates
– List VMs
"C:Program FilesOracleVirtualBoxVBoxManage.exe"  list vms
 "london1" {45ae6298-7e95-4ef1-864d-85c995cb46ff}
 "london2" {3c6a0e27-74f0-47ea-b3d7-ac9c253bb03b}
– Export the VMs
The OVA extension encapsulates all OVF folder content (.ovf,.mf*.vhd or *.vmdk) into a single zipped file
"C:Program FilesOracleVirtualBoxVBoxManage.exe" export "london1" -o  "H:OSORACLELab Oraclelondon1.ova"  --ovf10
"C:Program FilesOracleVirtualBoxVBoxManage.exe" export "london2" -o  "H:OSORACLELab Oraclelondon2.ova"  --ovf10
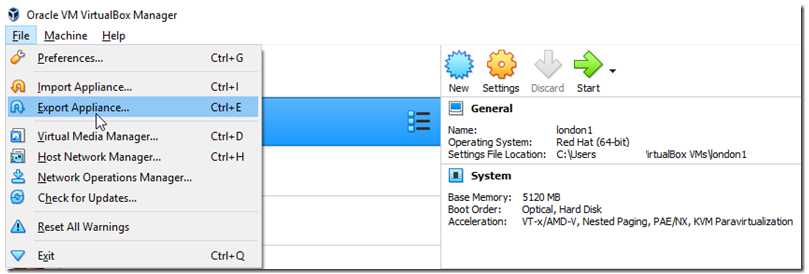
Note: You can also start Export Appliance Wizard for each VM which is the GUI equivalent to the above commands.
3. Copy the shared disks and exported VMs to a new Host
4. Import both VMS
"C:Program FilesOracleVirtualBoxVBoxManage.exe" import "D:VMRacattacklondon1.ova"     --options keepallmacs
"C:Program FilesOracleVirtualBoxVBoxManage.exe" import "D:VMRacattacklondon2.ova"     --options keepallmacs
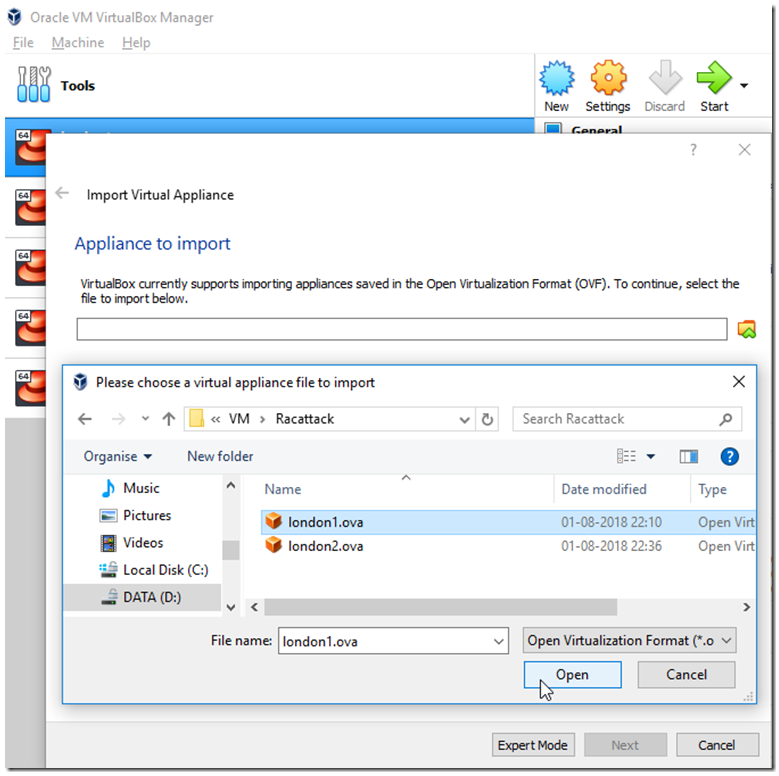
Note: You can also start Import Appliance Wizard for VM which is the GUI equivalent to the above commands.
*** Make sure your new computer’s VirtualBox Host Only Ethernet Adapter has the same IP segment than your Vms (example in my lab :192.168.78.1)
5. Change asm disks to shared
"C:Program FilesOracleVirtualBoxVBoxManage.exe" modifymedium disk "D:VMRacattackasm_1.vdi" –type shareable
"C:Program FilesOracleVirtualBoxVBoxManage.exe" modifymedium disk "D:VMRacattackasm_2.vdi"  --type shareable
"C:Program FilesOracleVirtualBoxVBoxManage.exe" modifymedium disk "D:VMRacattackasm_3.vdi"  --type shareable
"C:Program FilesOracleVirtualBoxVBoxManage.exe" modifymedium disk "D:VMRacattackasm_4.vdi"  --type shareable
"C:Program FilesOracleVirtualBoxVBoxManage.exe" modifymedium disk "D:VMRacattackasm_5.vdi"  --type shareable
Note: You can also do the above through Virtual Media Manager (GUI equivalent).
6. Attach the asm disks to both RAC VMs
"C:Program FilesOracleVirtualBoxVBoxManage.exe" storageattach london1 --storagectl "SATA" --port 1  --device 0 --type hdd --medium "D:VMRacattackasm_1.vdi" --mtype shareable
"C:Program FilesOracleVirtualBoxVBoxManage.exe" storageattach london1 --storagectl "SATA" --port 2  --device 0 --type hdd --medium "D:VMRacattackasm_2.vdi" --mtype shareable
"C:Program FilesOracleVirtualBoxVBoxManage.exe" storageattach london1 --storagectl "SATA" --port 3  --device 0 --type hdd --medium "D:VMRacattackasm_3.vdi" --mtype shareable
"C:Program FilesOracleVirtualBoxVBoxManage.exe" storageattach london1 --storagectl "SATA" --port 4  --device 0 --type hdd --medium "D:VMRacattackasm_4.vdi" --mtype shareable
"C:Program FilesOracleVirtualBoxVBoxManage.exe" storageattach london1 --storagectl "SATA" --port 5  --device 0 --type hdd --medium "D:VMRacattackasm_5.vdi" --mtype shareable
"C:Program FilesOracleVirtualBoxVBoxManage.exe" storageattach london2 --storagectl "SATA" --port 1  --device 0 --type hdd --medium "H:OSORACLELab Oracleasm_1.vdi" --mtype shareable
"C:Program FilesOracleVirtualBoxVBoxManage.exe" storageattach london2 --storagectl "SATA" --port 2  --device 0 --type hdd --medium "D:VMRacattackasm_2.vdi" --mtype shareable
"C:Program FilesOracleVirtualBoxVBoxManage.exe" storageattach london2 --storagectl "SATA" --port 3  --device 0 --type hdd --medium "D:VMRacattackasm_3.vdi" --mtype shareable
"C:Program FilesOracleVirtualBoxVBoxManage.exe" storageattach london2 --storagectl "SATA" --port 4  --device 0 --type hdd --medium "D:VMRacattackasm_4.vdi" --mtype shareable
"C:Program FilesOracleVirtualBoxVBoxManage.exe" storageattach london2 --storagectl "SATA" --port 5  --device 0 --type hdd --medium "D:VMRacattackasm_5.vdi" --mtype shareable
7. ReConfigure the asm disks in each RAC nodes
Since udev Device Mapping configuration got somehow lost during the import we will have to redo that again.
On each VM do the following:
7.1 Create partition from above added disks
– As root user use fdisk command to partition the attached disks. Repeat the steps below for all the disks (sdb, sdc, sdd,
sde,sdf).
 [root@london1 ~]# fidsk /dev/sd*
      >> n    -- new
      > p     -- primary
      > 1     -- 1 partition
      > w     -- write the change for all the disks
      [root@london1 ~]# ls -l /dev/sd?1
      brw-rw---- 1 root disk 8,  1 Jul 19 05:34 /dev/sda1
      brw-rw---- 1 root disk 8, 17 Jul 19 05:52 /dev/sdb1
      brw-rw---- 1 root disk 8, 33 Jul 19 05:53 /dev/sdc1
      brw-rw---- 1 root disk 8, 49 Jul 19 05:54 /dev/sdd1
      brw-rw---- 1 root disk 8, 65 Jul 19 05:54 /dev/sde1
      brw-rw---- 1 root disk 8, 65 Jul 19 05:54 /dev/sdf1
7.2 Verify scsi_id configuration
– The content of /etc/scsi_id.config should include the option -g for the scsi_id command to expect an UUID from the
shared devices. if not run the below in one line
printf "options=-g --whitelisted --replace-whitespace" > /etc/scsi_id.config
– Check if the the symbolic link for scsi_id is still there (RHEL 7 only)
ln -s '/usr/lib/udev/scsi_id' '/sbin/scsi_id'
7.3 Rebuild the Udev rules in the /etc/udev/rules.d/99-oracle-asmdevices.rules file
– Run the following script as root
i=1
cmd="/sbin/scsi_id -g -u -d"
for disk in sdb sdc sdd sde sdf; do
cat <<EOF >> /etc/udev/rules.d/99-oracle-asmdevices.rules
KERNEL=="sd?1",SUBSYSTEM=="block", PROGRAM=="$cmd /dev/$parent",
RESULT=="`$cmd /dev/$disk`", SYMLINK+="asm-disk$i", OWNER="grid", GROUP="dba", MODE="0660"
EOF
         i=$(($i+1))
done
7.4 Reload the udev rules and restart udev:
# /sbin/partprobe /dev/sdb1 /dev/sdc1 /dev/sdd1 /dev/sde1 /dev/sdf1
 # /sbin/udevadm test /block/sdb/sdb1
 # /sbin/udevadm test /block/sdc/sdc1
 # /sbin/udevadm test /block/sdd/sdd1
 # /sbin/udevadm test /block/sde/sde1
 # /sbin/udevadm test /block/sde/sdf1
 # /sbin/udevadm control --reload-rules
– Check the generated sim links
[root@london1 ~]# ls -l /dev/asm-*
 brw-rw---- 1 grid dba 8, 17 Jul 19 07:28 /dev/asm-disk1
 brw-rw---- 1 grid dba 8, 33 Jul 19 07:28 /dev/asm-disk2
 brw-rw---- 1 grid dba 8, 49 Jul 19 07:28 /dev/asm-disk3
 brw-rw---- 1 grid dba 8, 65 Jul 19 07:28 /dev/asm-disk4
 brw-rw---- 1 grid dba 8, 65 Jul 19 07:28 /dev/asm-disk4
