Intro
Vagrant is an opensource tool for working with virtual environments (VirtualBox,HyperV,Vmware..etc). It provides a simple command-line client for managing these environments, using a text-file (VagrantFile) defining the attributes of each environment.
To know more about vagrant you can try their getting started guide or consult the Vagrant official documentation.
Vagrant cloud already offers a plethora of existing Boxes, from windows to BSD (including numbers of Linux distros. But in case you are looking for a specific setup for your builds, you may need a custom box.
In this article we will create a prepackaged Vagrant box from a existing RedHat 8 base box then uppload/publish it into the Vagrant cloud.
Note: This box will include necessary packages to install Oracle 19c Database or grid infrastrcuture software on Rhel8. Feel free to use it in your vagrant builds (see link at the bottom of this post).
Pre-requisites
To create a Vagrant box from scratch there are few requirements to respect regarding the virtual machine
-
The first network interface (adapter 1) must be a NAT adapter. Vagrant uses this to connect the first
-
VirtualBox Guest Additions must be installed so that things such as shared folders can function.
However, these steps won’t be necessary here since we are customizing an already existing base box.
If you still want to know more about doing this from a new vm, check out Tim Hall’s example.
This tutorial is divided in two parts : I. Create the Oracle 19c ready Vagrant box , II. Share it online
I. Create the Oracle 19c ready Vagrant box from an existing one
1. Import a generic RHEL8 base Box in the local vagrant environment
On a new location in your Computer, Initialize the current directory to be a Vagrant environment and populate our
target online RedHat8 base box in the created Vagrantfile.
– Open a cmd box in your system and run the following commands
D:VMvagrant> vagrant init generic/rhel8
– Startup the vm
D:VMvagrant> vagrant up
– Stop the vm and attach the RHEL8 iso file to the optical drive in VirtualBox
D:VMvagrant> vagrant halt
– Restart the vm
D:VMvagrant> vagrant up
2. Create a local yum repository
[root@linuxtechi-rhel8 ~]# mount /dev/cdrom /media
[root@linuxtechi-rhel8 ~]# vi /etc/yum.repos.d/rhel8.repo

[InstallMedia-BaseOS]
name=Red Hat Enterprise Linux 8 - BaseOS
metadata_expire=-1
gpgcheck=0
enabled=1
baseurl=file:///media/BaseOS/

[InstallMedia-AppStream]
name=Red Hat Enterprise Linux 8 - AppStream
metadata_expire=-1
gpgcheck=0
enabled=1
baseurl=file:///media/AppStream/
**2.1: If you don’t have the .iso file at your disposal you can use the Online RedHat 8 beta repository to build your
repo (see below text ). Otherwise skip to next step.
[root@linuxtechi-rhel8 ~]# vi /etc/yum.repos.d/rhel8.repo
[rhel-8-for-x86_64-baseos-beta-rpms]
name = Red Hat Enterprise Linux 8 for x86_64 - BaseOS Beta (RPMs)
baseurl = https://downloads.redhat.com/redhat/rhel/rhel-8-beta/baseos/x86_64/
enabled = 1
gpgcheck = 0

[rhel-8-for-x86_64-appstream-beta-rpms]
name = Red Hat Enterprise Linux 8 for x86_64 - AppStream Beta (RPMs)
baseurl = https://downloads.redhat.com/redhat/rhel/rhel-8-beta/appstream/x86_64/
enabled = 1
gpgcheck = 0
– Remove the Red Hat subscription warning (unable to read consumer identity)
[root@linuxtechi-rhel8 ~]# vi /etc/yum/pluginconf.d/subscription-manager.conf
[main]
enabled=0
– Clean subscription data
[root@linuxtechi-rhel8 ~]# subscription-manager clean
Clear the repository cache by running the following command.
[root@linuxtechi-rhel8 ~]# dnf clean all  -- or yum clean all
– Verify whether Yum / DNF is getting packages from Local Repo
[root@linuxtechi-rhel8 ~]# dnf/yum repolist
Red Hat Enterprise Linux 8 - AppStream      7.1 MB/s | 5.3 MB     00:00
Red Hat Enterprise Linux 8 - BaseOS          24 MB/s | 2.2 MB     00:00

Last metadata expiration check: 0:00:02 ago on Fri 23 Aug 2019 03:40:20 PM UTC.
repo id                  reponame                                status
InstallMedia-AppStream       Red Hat Enterprise Linux 8 - AppStream     4,672
InstallMedia-BaseOS          Red Hat Enterprise Linux 8 - BaseOS        1,658
– Download and Install the 19c preinstall rpm package provided by oracle: Same goes for any oracle preinstall version
[root@linuxtechi-rhel8 ~]# curl -o oracle-database-preinstall-19c-1.0-1.el7.x86_64.rpm https://yum.oracle.com/repo/OracleLinux/OL7/latest/x86_64/getPackage/oracle-database-preinstall-19c-1.0-1.el7.x86_64.rpm

[root@linuxtechi-rhel8 ~]# yum -y localinstall oracle-database-preinstall-19c-1.0-1.el7.x86_64.rpm

Error:
  Problem: conflicting requests
 - nothing provides compat-libcap1 needed by oracle-database-preinstall-19c-1.0-1.el7
 - nothing provides compat-libstdc++-33 needed by oracle-database-preinstall-19c-1.0-1.el7
Solution: The above error occurred because the two mentioned rpms were missing from Red Hat 8 package base. We will
have to install them manually before the 19c preinstall package.
[root@linuxtechi-rhel8]# curl -o compat-libstdc++-33-3.2.3-72.el7.x86_64.rpm https://yum.oracle.com/repo/OracleLinux/OL7/latest/x86_64/getPackage/compat-libstdc++-33-3.2.3-72.el7.x86_64.rpm
[root@linuxtechi-rhel8 ~]# curl -o compat-libcap1-1.10-7.el7.x86_64.rpm https://yum.oracle.com/repo/OracleLinux/OL7/latest/x86_64/getPackage/compat-libcap1-1.10-7.el7.x86_64.rpm

[root@linuxtechi-rhel8]# rpm -ivh compat-libstdc++-33-3.2.3-72.el7.x86_64.rpm
[root@linuxtechi-rhel8]# rpm -ivh compat-libcap1-1.10-7.el7.x86_64.rpm
– Rerun yum Install on the 19c preinstall package
--
[root@linuxtechi-rhel8 ~]# yum -y localinstall oracle-database-preinstall-19c-1.0-1.el7.x86_64.rpm
Installed products updated.
Installed:
oracle-database-preinstall-19c-1.0-1.el7.x86_64
ksh-20120801-252.el8.x86_64                 libICE-1.0.9-13.el8.x86_64
libSM-1.2.3-1.el8.x86_64                    libX11-1.6.7-1.el8.x86_64
libX11-common-1.6.7-1.el8.noarch            libX11-xcb-1.6.7-1.el8.x86_64
libXau-1.0.8-13.el8.x86_64                  libXcomposite-0.4.4-14.el8.x86_64
libXext-1.3.3-9.el8.x86_64                  libXi-1.7.9-7.el8.x86_64                    libXinerama-1.1.4-1.el8.x86_64              libXmu-1.1.2-12.el8.x86_64
libXrandr-1.5.1-7.el8.x86_64                libXrender-0.9.10-7.el8.x86_64
libXt-1.1.5-8.el8.x86_64                    libXtst-1.2.3-7.el8.x86_64
libXv-1.0.11-7.el8.x86_64                   libXxf86dga-1.1.4-12.el8.x86_64
libXxf86misc-1.0.4-1.el8.x86_64             libXxf86vm-1.1.4-9.el8.x86_64
libdmx-1.1.4-3.el8.x86_64                   libxcb-1.13-5.el8.x86_64
xorg-x11-utils-7.5-28.el8.x86_64            xorg-x11-xauth-1:1.0.9-12.el8.x86_64
bc-1.07.1-5.el8.x86_64                      gssproxy-0.8.0-5.el8.x86_64
keyutils-1.5.10-6.el8.x86_64                libaio-devel-0.3.110-12.el8.x86_64
libverto-libevent-0.3.0-5.el8.x86_64    nfs-utils-1:2.3.3-14.el8.x86_64
quota-1:4.04-10.el8.x86_64                  quota-nls-1:4.04-10.el8.noarch
rpcbind-1.2.5-3.el8.x86_64                  smartmontools-1:6.6-3.el8.x86_64
unzip-6.0-41.el8.x86_64
– Add few more packages that will be needed for future oracle installations and builds
# New for OL8/RHEL8
[root@rhel8 ~]# yum instal libnsl
# Other rpms
[root@rhel8 ~]# yum install bind sysstat unixODBC unixODBC-devel binutils zip dnsmasq
– Add the default Vagrant ssh public key to avoid having ssh access issues after packaging your box
[root@rhel8 ~]# wget --no-check-certificate https://raw.githubusercontent.com/mitchellh/vagrant/master/keys/vagrant.pub -O .ssh/authorized_keys
[root@rhel8 ~]# shutdown -h now
3. Package the box using Vagrant
Once the VM is created and the Vagrant configuration is complete, we can turn the VM into a Vagrant box using the “vagrant
package” command.
cd D:VM
D:VM> vagrant package --base rhel8 --output rhel8_ora.box
==> rhel8: Exporting VM...
==> rhel8: Compressing package to: D:/VM/rhel8_ora.box
– You can now add it locally to the list of available boxes.
D:VM> vagrant box add D:/VM/rhel8_ora.box --name Scofieldd/rhel8_ora
==> box: Box file was not detected as metadata. Adding it directly...
==> box: Adding box 'scofieldd/rhel8_ora' (v0) for provider:
     box: Unpacking necessary files from: file:///D:/VM/rhel8_ora.box
     box: Progress: 100% (Rate: 437M/s, Estimated time remaining: --:--:--)
==> box: Successfully added box 'scofieldd/rhel8_ora' (v0) for 'virtualbox'!
– Check if the newly added base box is listed
D:VM> vagrant box list
generic/rhel8       (virtualbox, 1.9.22)
rhel8               (virtualbox, 0)
II. Upload your custom Boxes via the Vagrant Cloud Web Interface :
After you’ve created the .box file, these steps can be followed (the name is rhel8_ora and not
rhel8_ora1) .
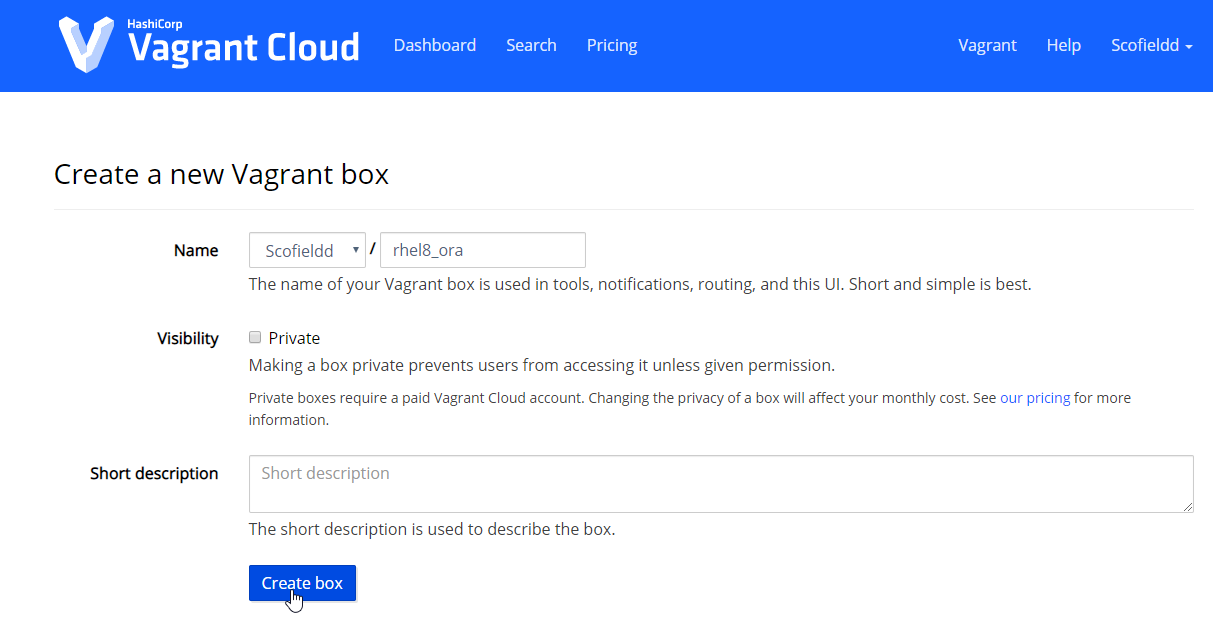
1. Go to the Create Box page and name the box and give it a simple description
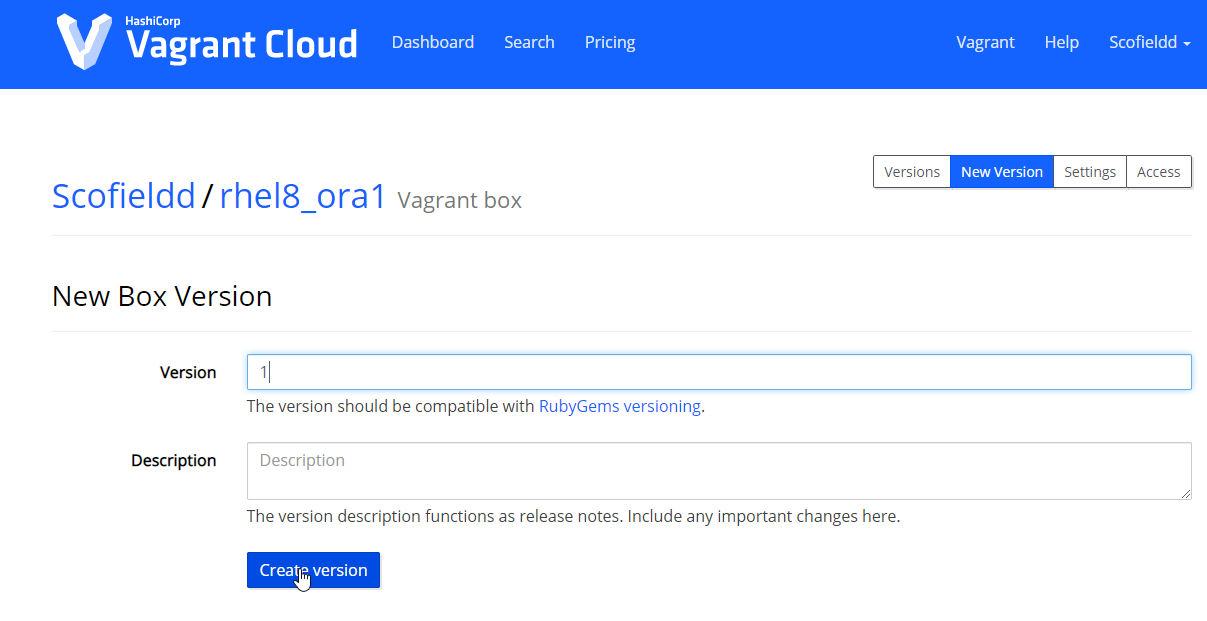
2. Create your first version for the box. This version must match the format [0-9].[0-9].[0-9]
3. Create a release version and a provider for the box which is virtualbox.
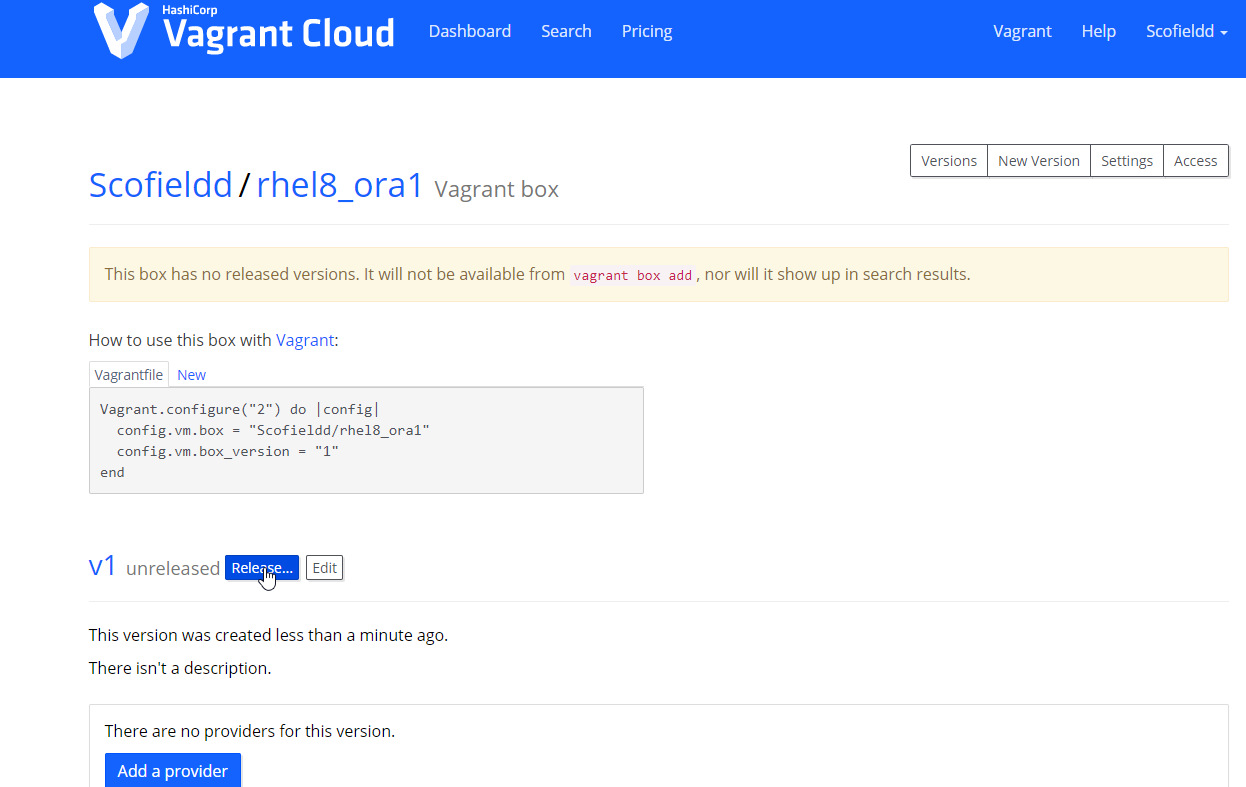
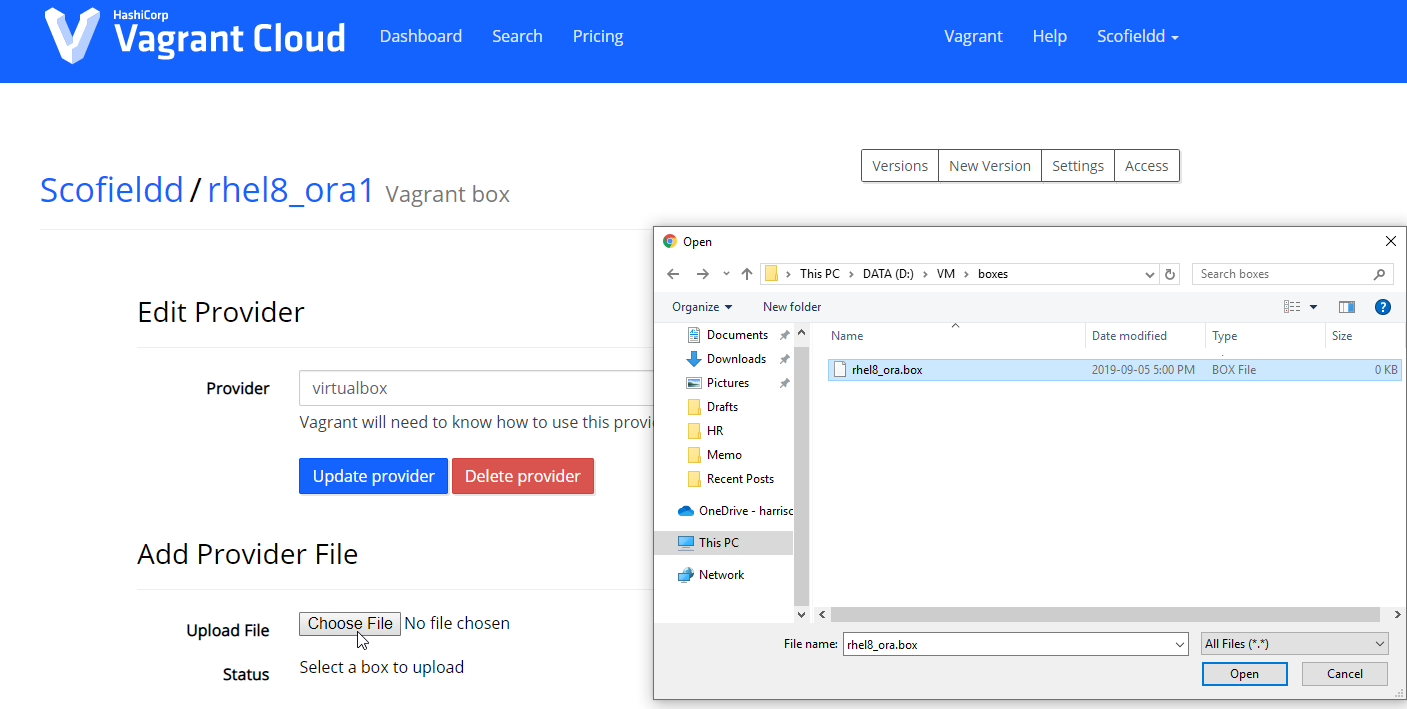
4. Upload the created rhel8_ora.box file for your provider (Virtualbox)
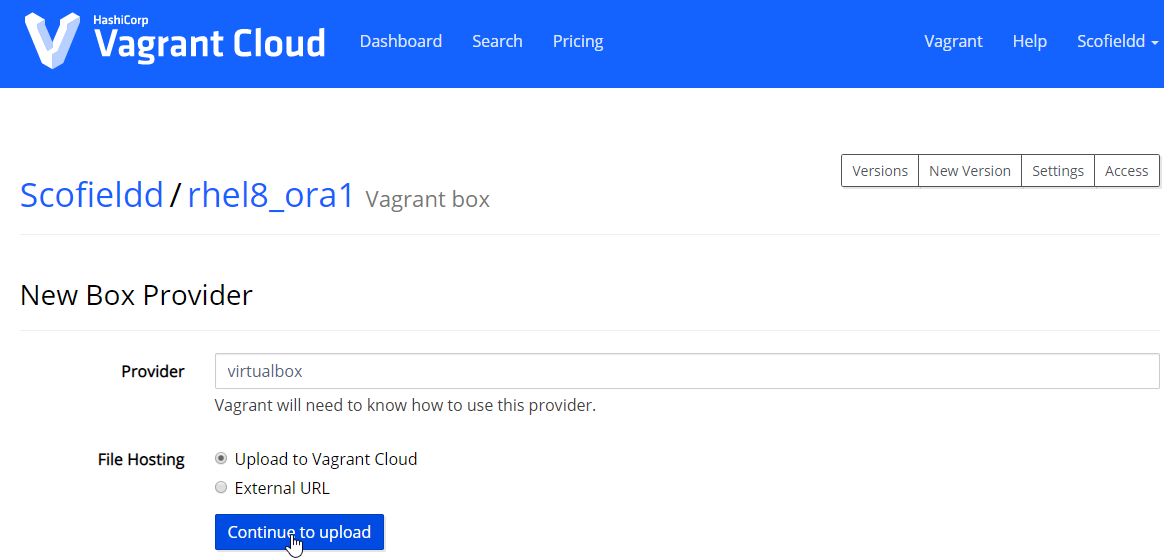
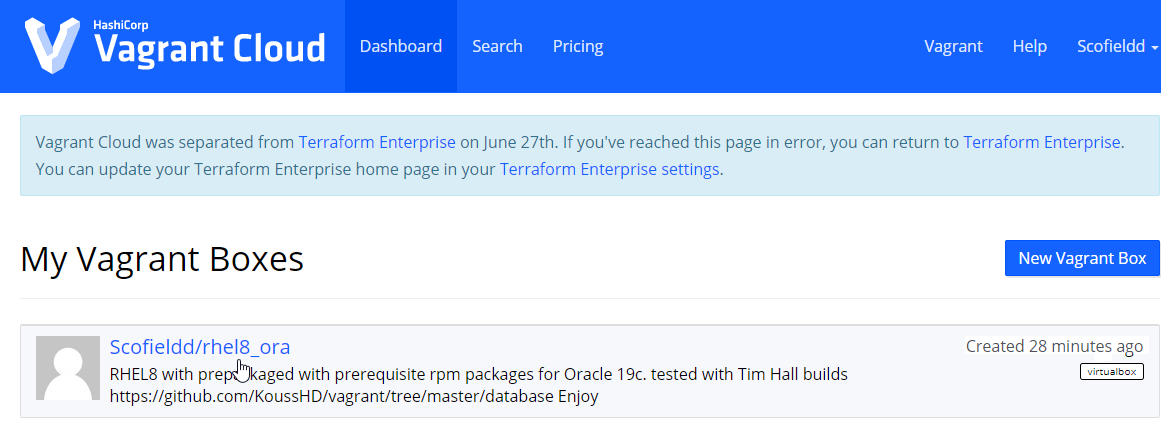
You can now find your new box in the Vagrant section of Vagrant Cloud.
To try this box just rerun the vagrant commands using the new box name (scofieldd/rhel8_ora) .
1. Initialise the vagrant file
D:VMvagrant> vagrant init scofieldd/rhel8_ora
D:VMvagrant> vagrant up
I’ll share Oracle builds for this box in my next blog post. Stay tunned 😉

