Intro
No Public IP? No Problem!
Deploying local apps for external testing from the internet can be a headache—especially if you lack a public IP or don’t want to mess with port forwarding. That’s where Ngrok & Zrok come in. These tools allow you to securely expose your local services to the internet. Plus, they provide free static domains—no extra configuration needed. Let’s dive in!
Host Your Local Services Online for Free
In this post we’ll show you how to share a local web app, or expose a private service without the networking hassle.
Pricing
Ngrok
Ngrok has also Pay as You Go plan but we focus on developer based offering. Seat-based pricing for dev and test
Zrok
Zrok a simpler pricing model but their team is open to address specific requirements.
Zrok vs Ngrok FREE tier
| Resource | ngrok (Free) | zrok (Free) |
|---|---|---|
| Data Transfer Out | 1 GB /Month | 5 GB daily |
| Free Endpoints (Static Domain) | 1 | Up to 5 Share Backends (2 reserved) |
| Reserved Endpoints | 0 | 2 |
| Requests | 20,000 | Unlimited |
| TCP Connections | 5,000 | Not specified |
| TLS Connections | 5,000 | Not specified |
| Private Access | No | 5 Private Access Frontends |
| Interstitial Ads | Yes | One-Time Interstitials |
| Support | Limited | Community Support |
Key Takeaways
- zrok’s free tier is much more generous, offering 5 GB of data per day vs. ngrok’s 1 GB total.
- zrok allows up to 5 shareable endpoints, whereas ngrok only allows 1.
- Private access frontends are included in zrok’s free plan, which ngrok lacks.
- Zrok offers 2 Reserved Endpoints (persistant URL) and not Ngrok.
- zrok has a one-time interstitial ad, while ngrok’s free tier has persistent ads.
ZROK

Use zrok is Open-source, self-hostable or managed sharing platform. It allows to share a running service, like a web server or a network socket, or to share a directory of static files. They include both Public shares and Private shares where only users with the share token can access your share.
In addition to what you can share publicly, private shares can include TCP and UDP service
Ziti native
zrok is a Ziti Native Application, built on the OpenZiti platform, and supported by the OpenZiti community and NetFoundry team.
Installation
Linux: You can install Zrok from a package repository as shown below.
curl -sSf https://get.openziti.io/install.bash | sudo bash -s zrok- Download and unarchive the x86_64 binary in a temporary directory.
mkdir /tmp/zrok && tar -xf ./zrok*linux*.tar.gz -C /tmp/zrok- Install the
zrokexecutable
sudo install /tmp/zrok/zrok /usr/bin/

zrok version
               _
 _____ __ ___ | | __
|_  / '__/ _ \| |/ /
 / /| | | (_) |   <
/___|_|  \___/|_|\_\

v0.4.0 [c889005]
Enable
On the Zrok portal click on the top right account menu & hit <enable your environment> to generate the zrok token.
To enable your shell for zrok, Copy the displayed command with the <tokenID> and run on your terminal:
$ zrok enable <Dxx651LWXD>
⢿ # the zrok environment was successfully enabled...
Check status
$ zrok status

Config:

 CONFIG           VALUE                SOURCE
 apiEndpoint      https://api.zrok.io  env
 defaultFrontend  public               binary

Environment:

 PROPERTY       VALUE
 Secret Token   <<SET>>
 Ziti Identity  <<SET>>


 ## json output
 $ zrok overview | jq .
 {
  "environments": [
    {
      "environment": {
        "address": "x.x.230.x",
        "createdAt": 1736721406102,
        "description": "brokedba@Ubuntu22",
        "host": "brokedba; Ubuntu22; linux; ubuntu; debian; 24.04;..",
        "updatedAt": 1736721406102,
        "zId": "xxxxx"
      }
    }
  ]
}
Public Shares
zrok supports public sharing for web-based (HTTP and HTTPS) resources to the internet through public access points
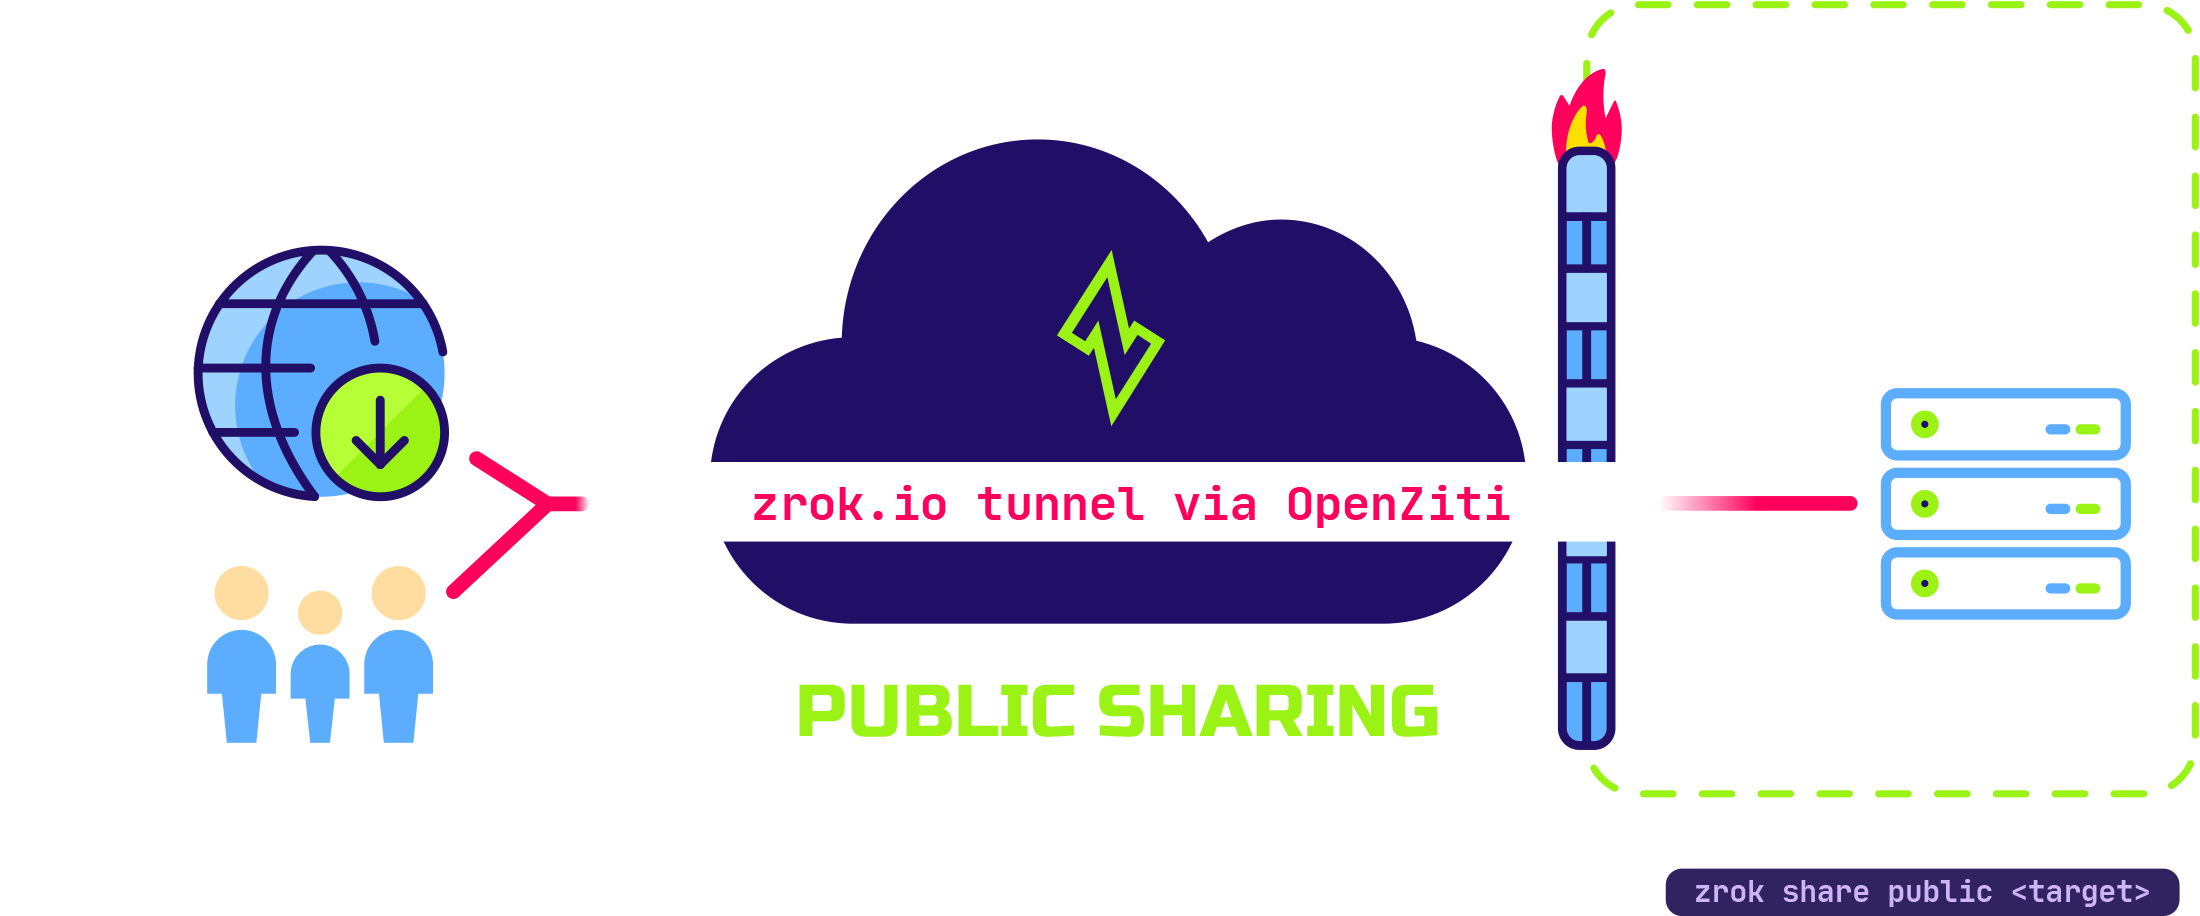
Use cases
Expose a Kubernetes endpoint (API/app), a docker container or even gateways like hashicorp Vault /Akeyless
proxy: I had to Generate a public hostname for my internal vault lab cluster to make it accessible online.
# Example with zrok
# create screen session to run zrok the Background
screen -S zork_session
zrok share public https://192.168.56.1:8200
# OR
zrok share public 8200

# check the genrated URL
╭──────────────────────────────────────────────────────────╮
│ https://kxxxx.share.zrok.io  ││     [PUBLIC] [PROXY]     │
╰──────────────────────────────────────────────────────────╯
# Get out
Ctrl-a + d
# Get back
screen -x  <session_name>
screen -r <session_name> # running session
File share
To share files using zrok use the --backend-mode web
zrok share public --backend-mode web .Reserved share
This is the best feature as it lets you set a custom and persistent endpoint name instead of random token renewed at each runs of zrok share. It’s Available on both public and private shares using --unique-name flag. see examples below:
Usage:
  zrok reserve <public|private> [<target>] [flags]
#1. Vault public share example
zrok reserve public https://192.168.56.1:8200 --unique-name "myvaultshare"
[ 3.707] INFO main.(*reserveCommand).run: your reserved share token is 'myvaultshare'
#2. local host http share
zrok reserve public 80 --unique-name "Myshare"Delete a reserved share
zroke release "Myvaultshare"Private Shares
zrok also provides a powerful Private shares that make a resource accessible on another user’s system as if it were local. Only other zrok users with your share token can access it, giving you full control.
$ zrok share private http://localhost:8080A private share is only exposed to the underlying OpenZiti network. The zrok service will respond with the following:
Another zroke user accros the world can execute the following command to have access locally
zrok access private xe4nicfcx80qzrok frontdoor
frontdoor is a reserved public share for a backend target with a seamless always-on Linux system service (systemd).

zrok-share package creates a zrok-share.service systemd unit. You can edit the service’s configuration file to specify:
- Zrok account token
- Target URL or files to be shared [web, proxy]
- Authentication options, if wanted [password, OAuth…]
vi /opt/openziti/etc/zrok/zrok-share.env
ZROK_ENABLE_TOKEN="14cbfca9772f"
ZROK_UNIQUE_NAME="my-prod-app"
# Use cases
# 1.Proxy a Web Server
ZROK_TARGET="http://127.0.0.1:3000"
ZROK_BACKEND_MODE="proxy"
# 2.Serve Static Files
ZROK_TARGET="/var/www/html"
ZROK_BACKEND_MODE="web"
# 3.Network Drive
ZROK_TARGET="/usr/share/doc"
ZROK_BACKEND_MODE="drive"
User interface
Portal
link : https://api.zrok.io. You can see details of all your end points (in a graph-like display) linked to your zrok account.
Dashboard
link: myzrok.io/dashboard. A bit confusing to have a dashboard on another link, but it mainly displays usage metrics.
Next -Ngrok (part II)
We’ve covered what zrok brings to the table, but how does it stack up against ngrok in real-world usage? In Part 2, we’ll dive into installation, enablement, and practical use cases—Stay tuned! 🚀